From Flat to “wow” – Pop, Pomp & Pizzazz in Product Photography
Ditch the light-box and go to strobes. Light tents flatten speculars and wash out micro-contrast—exactly why metals, glass and anything having shiny appearance are made to look dull when photographed in non-specular lighting. You want it Big and Hot (but controlled) — big, shaped soft light with controlled reflections, plus enough intense luminary punch to shoot at base ISO and f/11–f/16. (B\&H Photo Video)
Recommended strobes (by tier)
Top-tier (color/consistency kings)
- Profoto D2 500 AirTTL — rock-solid color in Normal mode (±≈150 K across the range) and “Freeze” when you need insane short flash durations. AC, fast recycle, built for tabletop. (Capture Integration, Profoto, 7-Eleven Rent)
- Broncolor Siros S (400/800) — ECTC keeps color constant over a 9-stop range; fast, precise, and great with strip boxes for gradient highlights. (broncolor)
Mid-tier (pro results, lower spend)
- Elinchrom ELC 125/500 — excellent color accuracy (about ±150–200 K over power range), quick recycle, powers down to very low Ws for tiny items. (Fstoppers, Elinchrom | What’s your next adventure?)
Budget workhorses (outstanding value)
- Godox/Flashpoint AD400Pro or AD600Pro — “Stable Color” mode keeps shifts to about ±75 K across the range; plenty of power to deepen DOF and make metals pop. (B\&H Photo Video, DIY Photography)
Any of the above will outperform video LEDs here because of peak output (lets you stop down and lower ISO) and cleaner specular control.
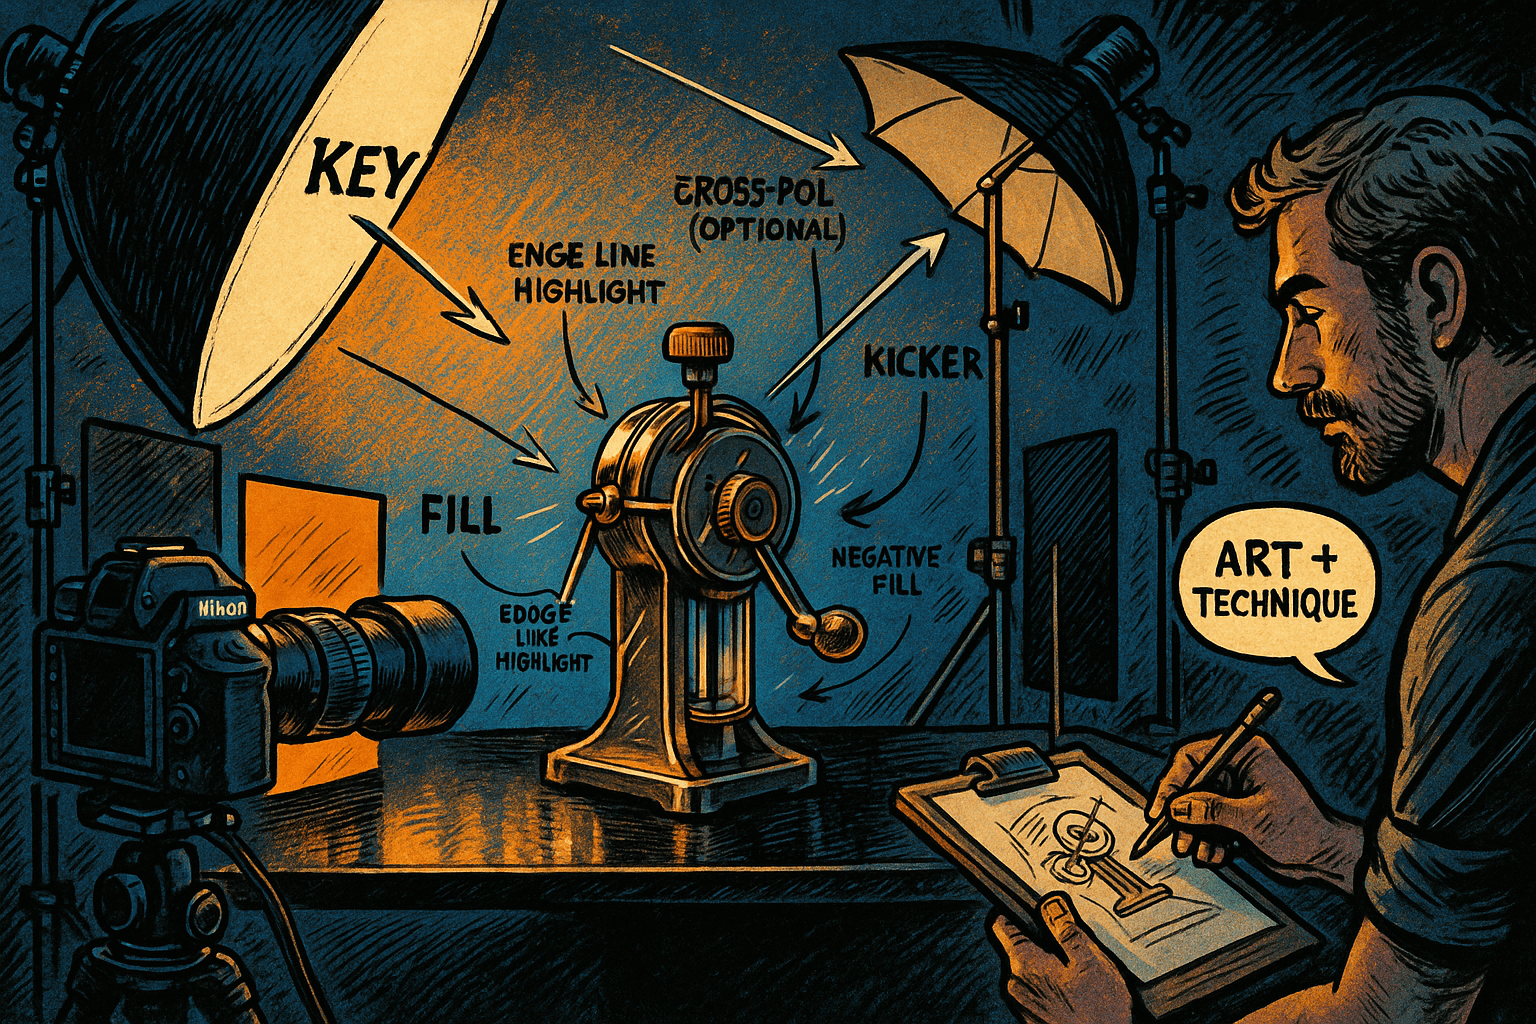
Modifiers & light shaping (the real secret sauce)
- Big, gradiented soft light
- Put a 3×4 ft (or 2×3) softbox through a 4×6 ft diffusion frame (opal/251/250/216) and tilt it so the light feathers across the product. That creates a tone gradient that defines curves on metal/leaf instead of the flat, wraparound light a tent gives. (Reddit)
- Edge/kicker control
- Add a strip softbox with grid just off-axis for the “line” highlight on ferrules, agate edges, and leaf texture.
- Negative fill for punch
- Park black cards/V-flats close to the subject to remove stray fill and deepen shadow edges. Instant pop. (Neil Oseman)
- Cross-polarization (when glare overwhelms detail)
- Linear polarizing film on the light(s) + a CPL on the lens, rotate to tame hot spots on glossy varnish/metal; then “back off” slightly to keep a pleasing metallic sheen. (PRO EDU)
A proven 2–3 light setup for your subjects
- Key: 400–800 Ws strobe into 4×6 diffusion (as above), ~45° up and ~30–60° off-axis.
- Fill: White card in front (not a light); move it to taste.
- Kicker: 1×3 strip w/ grid opposite the camera for the edge line.
- Flags: Black foam-core just outside frame lines for negative fill.
- Surface: White sweep for catalog; black acrylic if you want a controlled reflection.
- Camera: Base ISO, f/11–f/16, tethered; set white balance from a grey card per setup.
Why your light-box looks dull
Tents are great for killing reflections; they’re also great at killing shape. They produce uniform, shadowless illumination—perfect for “just-the-facts” pack shots, not for lustrous metals that need directed gradients and crisp edge contrast. (B\&H Photo Video)
Quick buy guide (pick one lane)
- Want zero-headache consistency? Profoto D2 500 pair + 3×4 softbox, 1×3 strip grid. (Capture Integration)
- Want the most control+speed in a monohead? Broncolor Siros S 800/400 pair + P70 + strip boxes. (broncolor)
- Want 80–90% of the result for way less? Godox AD400Pro/AD600Pro (use Stable Color mode) + the same modifiers. (B\&H Photo Video)
- Small objects / tiny DOF changes? Add an ELC 125 for ultra-low Ws and ultra-short distances without ND games. (Fstoppers)
Fast start (10-minute recipe)
- Kill ambient; set ISO 100, f/11, 1/200 s.
- Place the big diffused key; aim so it skims the subject.
- Add black cards until the subject gains edge contrast. (Neil Oseman)
- Add a strip kicker for a thin highlight.
- If hotspots remain, apply cross-pol and dial in the sheen you want. (PRO EDU)